Graphics Programming Guide
OpenGL ES Programming Guide
Introduction
OpenGL ES is a lightweight 3D graphics library designed specifically for embedded devices and is a subset of the OpenGL standard.
It provides a cross-platform interface well-suited for mobile devices and resource-constrained systems.
Compared to OpenGL, the main differences of OpenGL ES include:
- Data types: No support
doubletype; introduces high-performance fixed-point types. - Drawing commands: Removes
glBegin/glEnd/glVertex; retains commands likeglDrawArrays. - Texture handling: Requires supplying compressed textures directly to improve rendering efficiency.
EGL (Embedded Systems Graphics Library) is a key component in the OpenGL ES ecosystem.
It serves as a bridge between the OpenGL ES rendering API and the native windowing system.
As a platform-independent interface layer, EGL abstracts differences between hardware platforms and operating systems, providing a consistent runtime environment for OpenGL ES.
The main functions of EGL include:
- Graphics context management: Creating and maintaining OpenGL ES rendering contexts.
- Surface/Buffer creation: Responsible for creating drawing surfaces and buffers.
- Rendering synchronization: Coordinates synchronization between OpenGL ES and display devices to ensure correct rendering output.
- Resource management: Manages rendering resources such as texture maps.
Rendering Process
In the cooperation between OpenGL ES and EGL, the rendering process is the core of the entire graphics rendering system.
The diagram below shows the basic OpenGL ES rendering process.
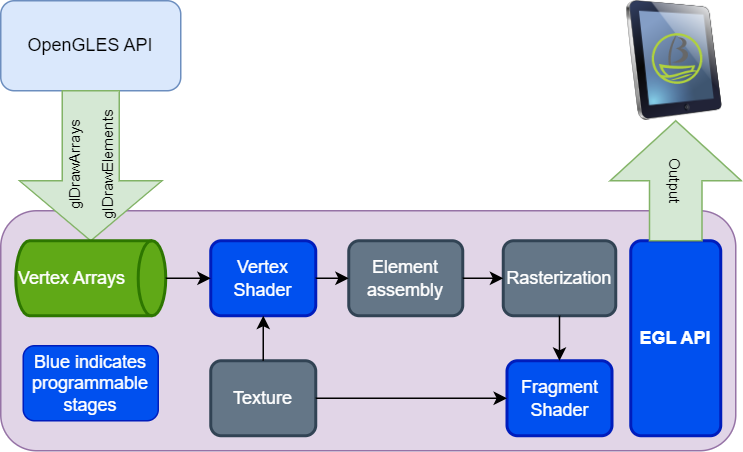
The rendering process typically involves five main steps:
-
EGL Initialization
EGL initialization is the first step of the rendering process, laying the foundation for subsequent rendering operations.
During this phase, the following key tasks are performed:- Obtain EGLDisplay object: Use
eglGetDisplay()to get the EGLDisplay object connected to the native window system. - Initialize EGL environment: Call
eglInitialize()to initialize EGL and retrieve its version information. - Choose EGLConfig: Use
eglChooseConfig()to select an appropriate EGL configuration specifying required rendering attributes such as color depth and alpha channel. - Create EGLContext: Use
eglCreateContext()to create the EGL rendering context, specifying the OpenGL ES version and other options as needed.
- Obtain EGLDisplay object: Use
-
Create Rendering Surface
Next, create a rendering surface as the target for OpenGL ES rendering. EGL provides several methods for surface creation:- Window Surface: Use
eglCreateWindowSurface()to create a rendering surface associated with the window system. - Pbuffer Surface: Use
eglCreatePbufferSurface()to create an offscreen rendering surface, often used for texture generation. - Pixmap Surface: Use
eglCreatePixmapSurface()to create a bitmap-based rendering surface.
- Window Surface: Use
-
Set Rendering Context
After creating the rendering surface, associate the EGLContext with the EGLSurface so OpenGL ES can render using the correct context. This is typically done viaeglMakeCurrent(). -
OpenGL ES Rendering Operations
Once the EGL environment is set up, OpenGL ES rendering can begin. Common steps include:- Set viewport: Define the rendering area using
glViewport(). - Clear buffers: Clear color, depth, and stencil buffers using
glClear(). - Activate shader program: Activate prepared shader programs using
glUseProgram(). - Pass rendering parameters: Pass vertex coordinates, texture coordinates, etc., using functions like
glVertexAttribPointer(). - Draw primitives: Render geometry using
glDrawArrays()orglDrawElements().
- Set viewport: Define the rendering area using
-
Swap Buffers
After rendering, swap the back buffer to the front buffer for display on the screen. This is usually done by callingeglSwapBuffers().
Additionally, EGL provides synchronization mechanisms such aseglWaitSyncKHR()to wait for specific rendering operations to complete. This helps developers better control the timing and order of rendering in complex scenes or multithreaded rendering.
EGL API
The EGL API is implemented by Mesa3D.
The k1x-gpu-test Demo provides usage examples and wrappers for the K1 platform.
Commonly used EGL APIs during a rendering process have been mentioned in the rendering flow above.
For more detailed usage, you can refer to the following resources:
OpenGL ES API
The current GPU DDK supports the latest OpenGL ES 3.2.
Below are some representative APIs:
-
Load Shader Source Code
void glShaderSource(GLuint shader, GLsizei count, const GLchar *const *string, const GLint *length);Used to load the specified source code strings into the specified shader object.
Parameter description:
-
shader: The shader object to load the source code into. -
count: The number of source code strings to load. -
string: An array of source code strings. -
length: An array of lengths for each source code string. Can be NULL, in which case strings are assumed to be null-terminated (\0).
-
-
Compile Shader
After loading the source code, call the following function to compile the shader:
void glCompileShader(GLuint shader)It compiles the source code into executable machine code and stores it in the shader object.
- The parameter
shaderis the identifier of the shader object to compile.
After compilation, you can call
glGetShaderInfoLogto obtain error information during the compilation process. - The parameter
-
Create Program Object
glCreateProgramis used to create a new OpenGL program object and returns a handle to it.
A program object is a container used to store and manage an OpenGL program.GLuint program = glCreateProgram(); // Create a new OpenGL program object -
Attach Shader to Program Object
void glAttachShader(GLuint program, GLuint shader)Used to attach a shader object to a shader program.
Parameter description:
program: The identifier of the program object to which the shader will be attached.shader: The identifier of the shader object to attach.
-
Link Program Object
void glLinkProgram(GLuint program)Used to link vertex and fragment shader programs of the programmable rendering pipeline (OpenGL Shading Language) into an executable program object.
If the linking succeeds, the function returnsGL_TRUE; otherwise, it returnsGL_FALSE. -
Create VAO and VBO
In OpenGL ES, vertex data needs to be transferred to the GPU for efficient rendering.- Vertex Array Object (VAO): Stores vertex attribute configurations (such as position, color, texture coordinates).
- Vertex Buffer Object (VBO): Actually stores the vertex data (such as coordinate points, normal vectors).
glGenVertexArraysandglGenBuffersare used to generate VAOs and VBOs. Using these, vertex data can be transferred to GPU memory at once, avoiding CPU-to-GPU transfers every frame and significantly improving rendering efficiency.
For detailed usage of the OpenGL ES 3.2 API, you can refer to:
OpenGL ES Demo
Introduction
In the Buildroot system, the demo source code is located at:
xxx/buildroot-sdk/package-src/k1x-gpu-test/openGLDemo
In the Bianbu desktop system, you can install k1x-gpu-test with the following command to get the related demo:
sudo apt install k1x-gpu-test
The demo directory structure is as follows:
.
|-- CMakeLists.txt //Makefile, used for compilation and building
|-- README.md
|-- common
|   |-- include //Header files
|   |   |-- stb_image.h //Single-header image loading library
|   |   |-- utils_opengles.h
|   |   `-- xdg-shell-client-protocol.h
|   `-- source
|       |-- utils_opengles.c //Encapsulation of calls to EGL and other functions
|       `-- xdg-shell-protocol.c //xdg-shell protocol
|-- cube_demo.c //Cube rotation
|-- cube_externalTexture_demo.c //Cube external texture mapping
|-- cube_texture_demo.c //Cube 2D texture mapping
|-- data //2D image file
|   |-- bianbu.png
|   `-- bianbu2.png
|-- square_demo.c //Rectangle
|-- texture_square_rotation_demo.c //Rectangle with 2D texture + rotation rendering
`-- triangle_demo.c //Triangle

4 directories, 15 files
Compile & Run
-
Enter the source code directory and execute the compilation
~ cd k1x-gpu-test/openGLDemo
~ cmake .
~ make
After compilation, an executable file will be generated in the current directory, for example:
./gpu-cubeTextureDemo -
To install, execute the
make installcommand in the current directory (i.e., the source directory); the executable will automatically be installed into/usr/local/bin/. After the installation is complete, simply run:gpu-cubeTextureDemo -
buildroot special settings
On buildroot, you must manually set the following environment variables before running:XDG_RUNTIME_DIR=/root WAYLAND_DISPLAY=wayland-1 MESA_LOADER_DRIVER_OVERRIDE=pvr ./gpu-cubeTextureDemo -
Runtime effect
After successful execution, the rendered output is shown below:
Adding a Demo
To add testDemo.c and build it as testDemo, modify CMakeLists.txt by adding an add_executable() line and updating target_link_libraries(), then rebuild:
add_definitions(-DSTB_IMAGE_IMPLEMENTATION)
add_definitions(-DNDEBUG)

# Define the list of common source files
set(COMMON_SOURCE_FILES
    ${CMAKE_CURRENT_SOURCE_DIR}/common/source/xdg-shell-protocol.c
    ${CMAKE_CURRENT_SOURCE_DIR}/common/source/utils_opengles.c
)

include_directories(
    ${CMAKE_CURRENT_SOURCE_DIR}/common/include/
)

# Add link libraries
set(LINK_LIBRARIES
    EGL
    GLESv2
    wayland-client
    wayland-server
    wayland-egl
    m
    wayland-cursor
    gbm
)

add_executable(gpu-cubeDemo ${CMAKE_CURRENT_SOURCE_DIR}/cube_demo.c ${COMMON_SOURCE_FILES})
add_executable(testDemo ${CMAKE_CURRENT_SOURCE_DIR}/testDemo.c ${COMMON_SOURCE_FILES}) # Create a new executable

target_link_libraries(gpu-cubeDemo ${LINK_LIBRARIES})
target_link_libraries(testDemo ${LINK_LIBRARIES})

# Install: copy the executable to the specified directory
install(
    TARGETS
    gpu-cubeDemo
    testDemo
    DESTINATION "${CMAKE_INSTALL_PREFIX}/bin")

file(GLOB IMAGE_FILES "data/*.png")
install(
    FILES ${IMAGE_FILES}
    DESTINATION "${CMAKE_INSTALL_PREFIX}/data")
After the modifications, run the build again:
make
The new executable testDemo is generated.
Vulkan
Introduction
Vulkan is a new-generation, cross-platform graphics rendering API released by the Khronos Group in 2015. It is designed to provide low-level access to modern GPUs, enabling more efficient performance.
Compared to OpenGL, Vulkan’s key feature is that it allows developers to exert fine-grained control over GPU resources, for example:
- Precisely specifying when tasks are submitted to the GPU
- Controlling memory allocation
- Managing multi-threaded concurrency and scheduling
This design can yield significant performance gains, but at the cost of an API that is more complex and verbose.
The PVR GPU driver offers a concrete implementation of the Vulkan API; applications can complete rendering tasks by calling the corresponding API functions.
For detailed usage of the Vulkan API, please refer to:
Vulkan Demo
To be continued