CPP & ISP & MIPI-CSI
K1 的 CPP&ISP&MIPI-CSI 是基于标准的 V4L2 接口实现,并提供了完整的测试程序供参考。
1 规格
MIPI CSI (CSI-2 V1.1) 4lane (x2)
- 4 Lane + 4 Lane mode
- 4 Lane + 2 Lane mode
- 4 Lane + 4 Lane + 2 Lane mode(triple sensor)
- DPHY V1.1,Up to 1.5Gbps/lane
- Support RAW8/RAW10/RAW12/RAW14 and legacy yuv420 8-bit、yuv420 8-bit input foramt
ISP 介绍:图像信号处理器,用于处理传感器输出的图像信号,经过一系列数字图像处理算法达到预期的图像效果处理。包括坏点校正、镜头阴影校正、降噪、相位补偿与矫正、背光补偿、色彩增强等处理。
- 支持两路 pipeline(时分复用),能同时处理两路 stream,stream 的来源可以是 sensor 或者从 ddr 读取。
- 每路 pipeline 输出的最大图像为 1920x1080。
- 两路 pipeline 同时工作时,每个 pipeline 在没有开启 PDAF(相位对焦)时输入的图像最大 size 为 4748x8188;在开启 PDAF 时输入的图像最大 size 为 3264x8188。
- 只有一路 pipeline 工作时,在没有开启 PDAF(相位对焦)时输入的图像最大 size 为 9496x8188;在开启 PDAF 时输入的图像最大 size 为 6528x8188。
- 输入宽高都需要是 4 的倍数。
CPP 介绍:图像后处理模块,用于离线处理 ISP 输出的 NV12,金字塔式多层分时处理,主要功能包括:镜头畸变矫正、空域和时域降噪、频域降噪、边沿增强等。
- 输入支持 NV12_DWT 格式、输出支持 NV12_DWT、FBC_DWT 格式数据。NV12_DWT 格式 Buffer 是由标准的 NV12 Buffer 和 ASR 私有的 DWT Buffer 组成。
- 图像支持的最大高度:3136
- 图像支持的最大宽度:4224
- 图像支持的最小高度:288
- 图像支持的最小宽度:480
- 输入、输出 size 一致
2 流程框图
2.1 ISP online 整体流程
ISP online 时模块连接如下:
sensor –> VI_DEV -> ISP_FW –> VI_CHN -> DDR -> CPP
编写代码时,需要先配置 sensor, VI, ISP, CPP 各个模块,注册各个模块 buffer 回调,然后依次 streamon ISP 和 sensor。sensor 开始出流后,ISP 图像处理过程中会发生中断,各模块进行中断处理后调用模块回调处理 buffer;当程序退出时,建议先停止 vi,再停止 sensor,再依次执行 CPP, ISP, VI 的反初始化配置,并释放使用的 buffer。软件流程图如下:
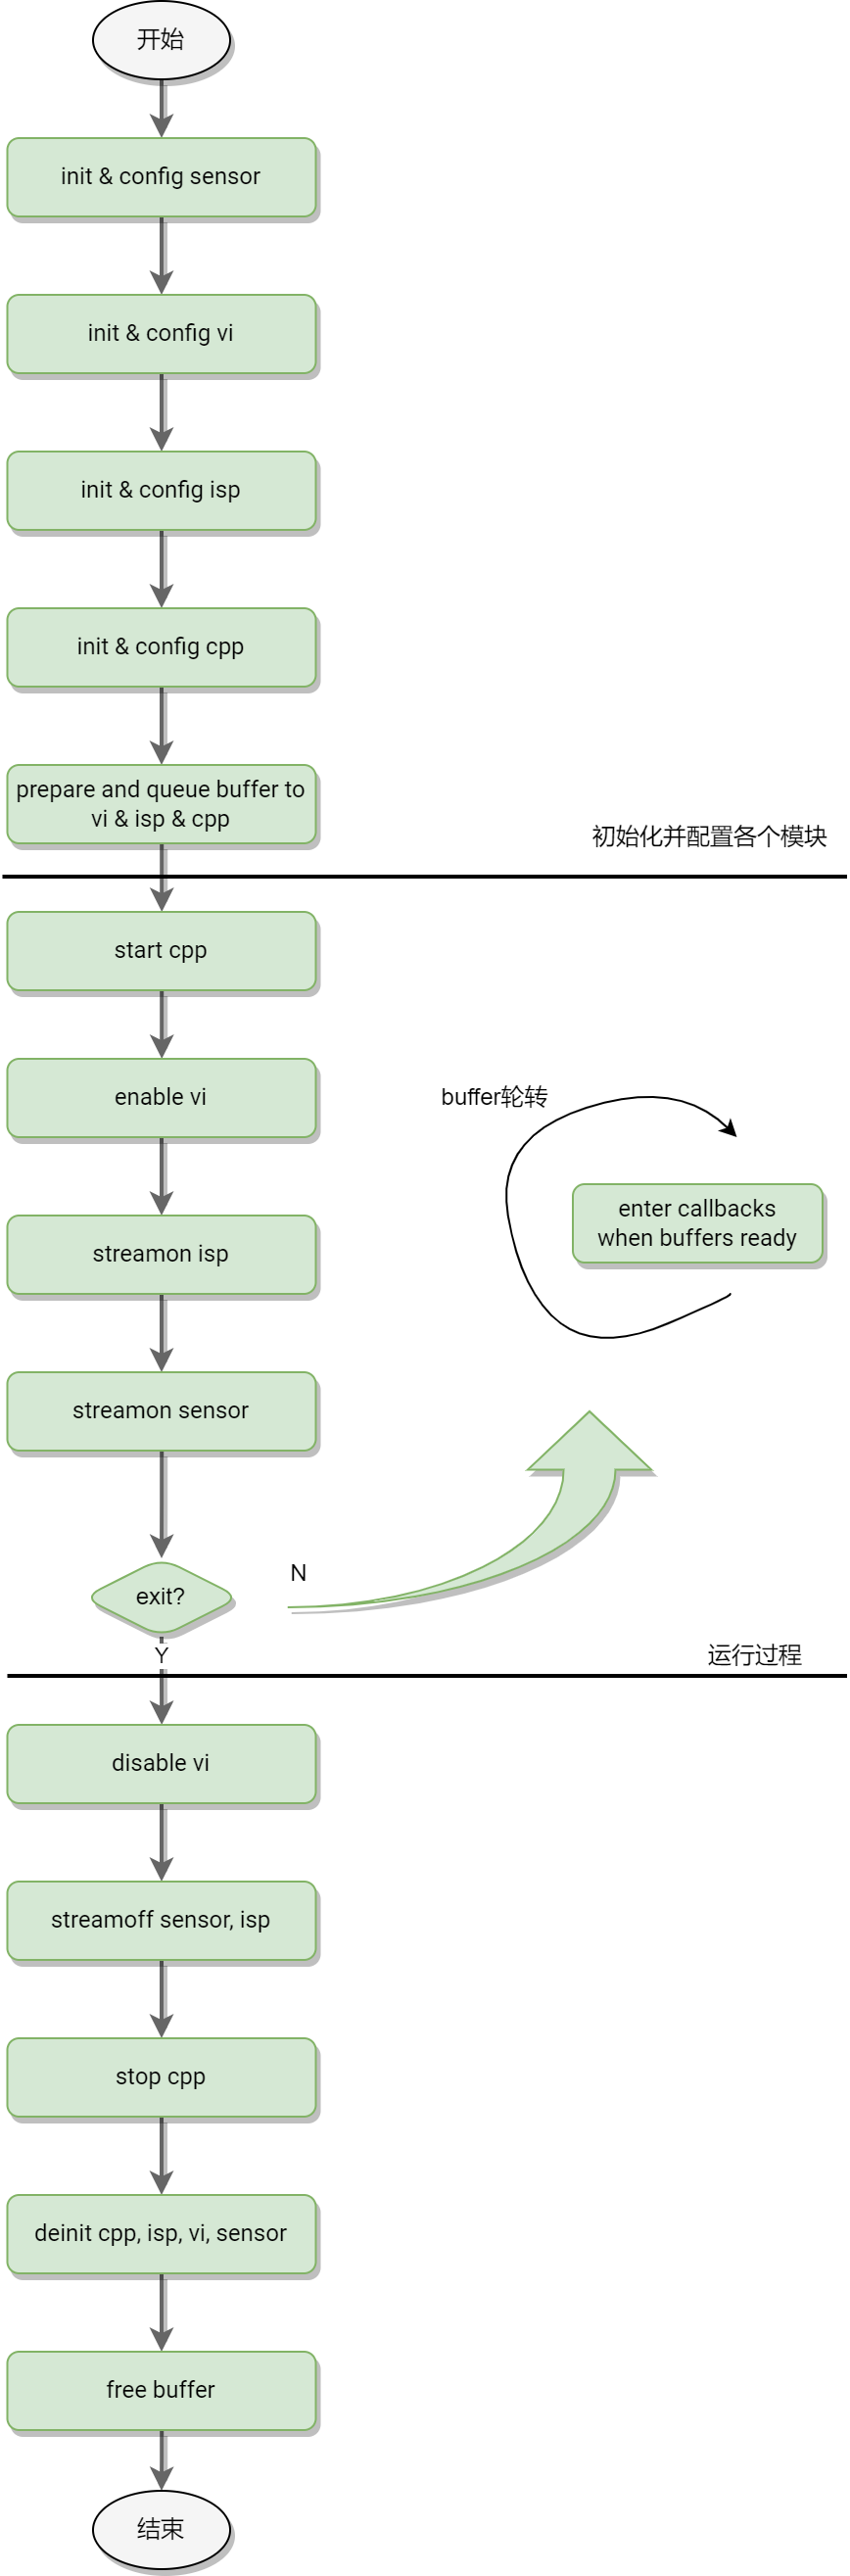
Figure - 5 ISP online 整体流程图
buffer 轮转:
streamon 之前,准备好输入输出 buffer,并将输出 buffer queue 进各个模块 buffer list,
streamon 之后,输出 buffer list ready 之后调用各个模块对应的 buffer callback,
buffer callback 由用户实现,负责获取 buffer 数据并将 done buffer 再次 queue 入模块。
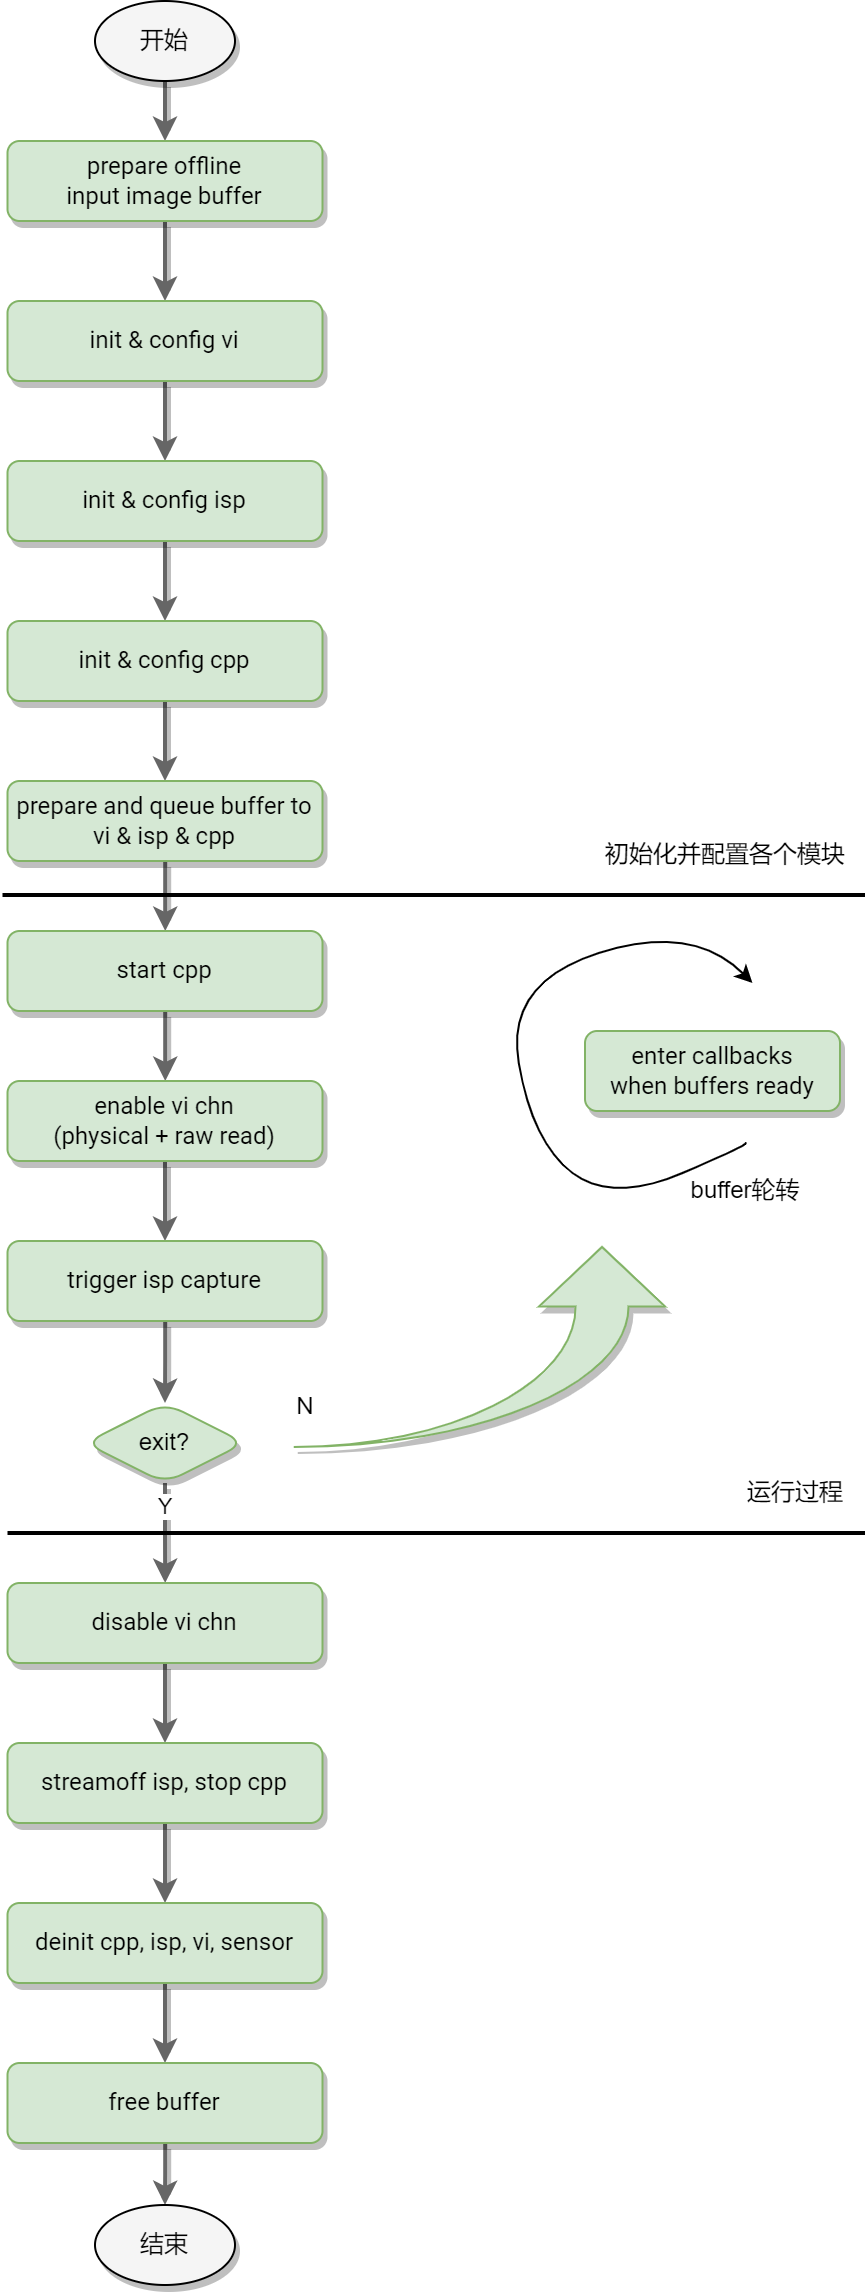
2.2 ISP offline 整体流程
ISP offline 时模块连接如下:
DDR -> VI_DEV -> ISP_FW –> VI_CHN -> DDR -> CPP
跟 ISP online 相比,ISP 从 DDR 读取输入数据,所以除了数据源配置和 buffer 回调方面有所差异,其他部分流程基本一样。下图展示的是 offline 模式下的 ISP capture mode 流程:
3 测试程序使用说明
k1x-cam 是一套用于测试验证 K1 芯片的 MIPI CSI + ASR ISP/CPP 功能的程序集,也可以作为客户开发自己的应用程序(需要熟悉了解 API 的使用说明)的参考。
3.1 安装说明
3.1.1 Bianbu 桌面系统
源中已经集成了 k1x-cam,直接使用 apt 命令来安装即可。
sudo apt update
sudo apt install k1x-cam
3.1.2 Buildroot 系统
TODO
3.2 使用说明
k1x-cam 的测试程序集中主要包含下面几个测试程序:
- cam-test:用于单路 pipeline,双路 pipeline,单 raw pipeline,单 cpp 处理等测试验证
- cam_sensors_test:用于简单的 sensor detect -> init -> stream on 流程调试验证
3.2.1 cam-test
一些基本用法
使用实例:cam-test <file.json>

//单pipeline在线测试:imx135(4208x3120@30fps raw10 4lane) –> ISP -> DDR(1080p@30fps) -> CPP
命令:cam-test demo/cfgs/0/camtest_sensor0_mode0.json

//单pipeline在线测试:imx135(4208x2416@30fps raw10 4lane) –> ISP -> DDR(1080p@30fps) -> CPP
命令:cam-test demo/cfgs/0/camtest_sensor0_mode1.json

//单pipeline在线测试:imx135(2104x1560@30fps raw10 4lane) –> ISP -> DDR(1080p@30fps) -> CPP
命令:cam-test demo/cfgs/0/camtest_sensor0_mode2.json

//单pipeline在线测试:imx135(2104x1560@30fps raw10 4lane) –> ISP -> DDR(1080p@30fps) -> CPP
命令:cam-test demo/cfgs/0/camtest_sensor0_mode2.json

//双pipeline capture测试:imx135(2104x1560@30fps raw10 4lane) –> ISP -> DDR(1080p@30fps) -> CPP
命令:cam-test demo/cfgs/2/camtest_sensor0_mode0.json

//only raw dump pipeline测试:imx135(4208x3120@30fps raw10 4lane) –> ISP(VI) -> DDR
命令:cam-test demo/cfgs/3/camtest_sensor0_mode0.json

//only isp online pipeline测试:imx135 –> ISP -> DDR(NV12)
命令:cam-test demo/cfgs/4/camtest_sensor0_mode0_nv12.json

//only isp online pipeline测试:imx135 –> ISP -> DDR(p010)
命令:cam-test demo/cfgs/4/camtest_sensor0_mode0_p010.json

//only isp online pipeline测试:imx135 –> ISP -> DDR(p210)
命令:cam-test demo/cfgs/4/camtest_sensor0_mode0_p210.json

//only isp online pipeline测试:imx135 –> ISP -> DDR(rgb565)
命令:cam-test demo/cfgs/4/camtest_sensor0_mode0_rgb565.json

//only isp online pipeline测试:imx135 –> ISP -> DDR(rgb888)
命令:cam-test demo/cfgs/4/camtest_sensor0_mode0_rgb888.json

//only isp online pipeline测试:imx135 –> ISP -> DDR(y210)
命令:cam-test demo/cfgs/4/camtest_sensor0_mode0_y210.json

//双pipeline online测试:imx135+gc2375h –> ISP -> DDR -> CPP
命令:cam-test demo/cfgs/1/camtest_main_aux.json
3.2.2 JSON 参数说明
以 sdktest_main_aux.json 为例进行说明:
{
    "tuning_server_enable":1, //用于isp tunning服务使能,在only isp online、单pipeline online、双pipeline online测试有效
    "show_fps":1,    //统计从0~120帧的平均帧率
    "auto_run": 1,    //自动测试,没有用户交互过程

    "cpp_node": [    //CPP模块
            {
                    "name": "cpp0",    //cpp group0
                    "enable": 1,
                    "format":"NV12",
                    "src_from_file": 0,    //如果ISP和cpp都enable了,cpp的输入就来自ISP输出

                    "src_path":"/tmp/cpp_case_in_data/1920x1080/",
                    "size_width":1920,
                    "size_height":1080,
            },
            {
                    "name": "cpp1",    //cpp group1
                    "enable": 1,
                    "format":"NV12",
                    "src_from_file": 0,    //

                    "src_path":"/vendor/etc/camera/",
                    "size_width":1920,
                    "size_height":1080,
            },
        ],

    "isp_node":[    //ISP模块,1个ISP可以接入两路video stream input
            {
                    "name": "isp0",    //isp0在线模式工作,输出1080p@30fps NV12
                    "enable": 1,
                    "work_mode":"online",
                    "format":"NV12",
                    "out_width":1920,
                    "out_height":1080,

                    "sensor_name":"imx135_asr",    //imx135对应/dev/cam_sensor0,工作在模式0
                    "sensor_id" : 0,
                    "sensor_work_mode":0,
                    "fps":30,

                    "src_file":"/tmp/1920x1080_raw12_long_packed.vrf",    //不生效(使用在其他模式)
                    "bit_depth": 12,    //不生效
                    "in_width":1920,    //不生效
                    "in_height":1080,    //不生效

            },
            {
                    "name": "isp1",    //isp1在线模式工作,输出1600x1200@30fps NV12
                    "enable": 1,
                    "work_mode":"online",
                    "format":"NV12",
                    "out_width":1600,
                    "out_height":1200,

                    "src_file":"/tmp/1920x1080_raw12_long_packed.vrf",    //不生效
                    "bit_depth": 12,    //不生效
                    "in_width":1920,    //不生效
                    "in_height":1080,    //不生效

                    "sensor_name":"gc2375h_asr",    //gc2375h对应/dev/cam_sensor1,工作在模式0
                    "sensor_id" : 1,
                    "sensor_work_mode":0,
                    "fps":30,
            },
    ]
}
json 参数更详细的作用,可以分析 config.c 和 online_pipeline_test.c/main.c 的具体应用场景。
3.2.3 cam_sensors_test
一些基本用法
使用示例:cam_sensors_test [devId] [sensors_name]
输入执行命令后,在交互终端输入 s 字符后进行开流动作,如果没有报错。可以验证流程 sensor detect -> init -> stream on 基本正常。
4 SENSOR 调试
详见“K1 Camera 快速启动指南”。
5 ISP 效果调试
ISP 效果调试可能需要使用到的工具包括:调试工具(Tuning Tool)、定标插件(Calibration Plugins)、图像分析工具(VRF viewer),平台调试辅助等。
详见“K1 ISP 效果调试指南”。
6 API 使用说明
描述的 API 都是 ISP SDK 面向应用的,分为系统控制 API、图像效果设置 API 和 tuning 相关的 API,详细解释了相关的参数数据结构、错误码和返回值。主要面向 ISP 效果相关的 tuning 和算法工程师,以及图像相关相关的 setting 功能开发的应用工程师。
详见“K1 ISP API 开发指南”。