Gstreamer 用户使用指南
GStreamer 介绍
GStreamer 是一个开源的多媒体框架。该框架基于插件进行设计,所有的插件都能够被链接到任意的已经定义了的数据流管道中。
官方网址:https://gstreamer.freedesktop.org
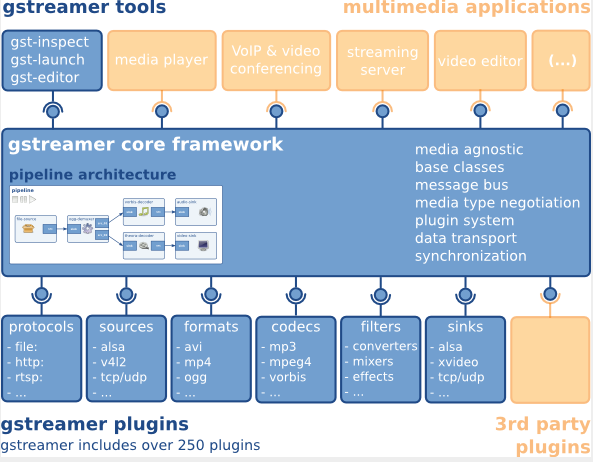
GStreamer 框架
Gstreamer 可以通过创建一系列的元件(element),并把它们连接起来,从而让数据流在这个被连接的各个元件(element)之间传输,从而创建一个管道(pipeline)来完成一个特殊的任务,例如:媒体播放�或者录音。
Gstreamer 框架如下图所示:
Gstreamer 源码分布结构
GStreamer 的源码按照功能模块被划分到不同的代码仓库(repo)中,每个仓库负责不同的功能。以下是各个仓库的简要说明:
| 仓库名称 | 功能描述 |
|---|---|
gstreamer | 框架和基本库 |
gst-plugins-base | 框架和基本库 |
gst-plugins-good | 成熟且稳定的插件 |
gst-plugins-bad | 正在开发中的插件,可能不稳定 |
gst-plugins-ugly | 有 license 问题的插件,用户可以根据地域和法规,进行选择性的规避或安装 |
gst-libav | 基于 libav 的编解码器插件持。 |
这种结构使得每个仓库独立,但都依赖于 gstreamer 和 gst-plugins-base。
Gstreamer 安装
安装 Gstreamer-1.0 需运行命令:
sudo apt-get update

sudo apt-get install gstreamer1.0-tools gstreamer1.0-alsa gstreamer1.0-plugins-base gstreamer1.0-plugins-good  gstreamer1.0-plugins-bad gstreamer1.0-plugins-ugly gstreamer1.0-libav

sudo apt-get install libgstreamer1.0-dev libgstreamer-plugins-base1.0-dev libgstreamer-plugins-good1.0-dev libgstreamer-plugins-bad1.0-dev
检查 Gstramer-1.0 的版本,需执行命令:
gst-inspect-1.0 --version
Gstreamer 插件说明
可以使用以下命令查询当前 Bianbu OS/Buildroot 系统中 GStreamer 默认支持的插件情况:
gst-inspect-1.0
如果在 gst-inspect-1.0 命令后加上具体的插件名称,可以输出该插件的详��细信息。
Video Decoder Plugins
视频解码器的作用是将视频源格式转换为可以被目标接收器(例如显示器)解释的原始格式。Spacemit GStreamer 支持 spacemitdec 专有插件,该插件可以帮助用户获得更优质的结果。
| Video Decoder | Package | Description | Bianbu OS(Y/N) | Buildroot(Y/N) |
|---|---|---|---|---|
| decodebin | gst-plugins-base | Autoplug and decode to raw media | Y | Y |
| spacemitdec | gst-plugins-bad | Decodes H264/H265/MJPEG/VP8/VP9/MPEG2/MPEG4 via MPP API | Y | Y |
| avdec_xxxx | gstreamer1.0-libav | ffmpeg plugin for GStreamer | Y | Y |
| mpeg2dec | gst-plugins-ugly | mpeg1 and mpeg2 video decoder | Y | N |
| openh264dec | gst-plugins-bad | OpenH264 video decoder | Y | N |
| jpegdec | gst-plugins-good | Decode images from JPEG format | Y | N |
| vp8dec | gst-plugins-good | On2 VP8 Decoder | Y | N |
| vp9dec | gst-plugins-good | On2 VP9 Decoder | Y | N |
Video Encoder Plugins
视频编码器的作用是将原始数据转换为编码的视频格式,例如 H.264 格式。Spacemit GStreamer 支持 spacemit*enc 专有插件,这些插件可以帮助用户获得更优质的结果。
| Video Encoder | Package | Description | Bianbu OS(Y/N) | Buildroot(Y/N) |
|---|---|---|---|---|
| encodebin | gst-plugins-base | Convenience encoding/muxing element | Y | N |
| spacemith264enc | gst-plugins-bad | Encodes H264 via MPP API | Y | Y |
| spacemith265enc | gst-plugins-bad | Encodes H265 via MPP API | Y | Y |
| spacemitmjpegenc | gst-plugins-bad | Encodes MJPEG via MPP API | Y | Y |
| spacemitmpegenc | gst-plugins-bad | Encodes MPEG2/MPEG4 via MPP API | Y | Y |
| spacemitvp8enc | gst-plugins-bad | Encodes vp8 via MPP API | Y | Y |
| spacemitvp9enc | gst-plugins-bad | Encodes vp9 via MPP API | Y | Y |
| avenc_xxxx | gstreamer1.0-libav | ffmpeg plugin for GStreamer | Y | Y |
| mpeg2enc | gst-plugins-ugly | mpeg2enc video encoder | Y | N |
| openh264enc | gst-plugins-bad | OpenH264 video encoder | Y | N |
| jpegenc | gst-plugins-good | JPEG image encoder | Y | N |
| vp8enc | gst-plugins-good | On2 VP8 Encoder | Y | N |
| vp9enc | gst-plugins-good | On2 VP9 Encoder | Y | N |
Video Sink Plugins
视频接收插件的作用是将处理后的数据通过显示输出进行展示。Spacemit GStreamer 优化了 glimagesink/gtkglsink/waylandsink 插件,�这些插件可以帮助用户获得更优质的结果。
| Video Encoder | Package | Description | Bianbu OS(Y/N) | Buildroot(Y/N) |
|---|---|---|---|---|
| autovideosink | gst-plugins-good | Wrapper video sink for automatically detected videosink | Y | Y |
| glimagesink | gst-plugins-base | Infrastructure to process GL textures | Y | N |
| waylandsink | gst-plugins-bad | Output to wayland surface | Y | Y |
| gtkglsink | gst-plugins-good | A video sink that renders to a GtkWidget using OpenGL | Y | N |
| fpsdisplaysink | gst-plugins-bad | Video sink with current and average framerate | Y | N |
Demux Plugins
解复用器插件的作用是将不同的视频/音频格式转换为原始的。
| Video Demux | Package | Description | Bianbu OS(Y/N) | Buildroot(Y/N) |
|---|---|---|---|---|
| qtdemux | gst-plugins-good | Demux a .mov/.mp4 file to raw data | Y | Y |
| matroskedemux | gst-plugins-good | Demux a .mkv file to raw data | Y | N |
| flvdemux | gst-plugins-good | Demux a .flv file to raw data | Y | N |
| avidemux | gst-plugins-good | Demux a .avi file to raw data | Y | Y |
Mux Plugins
复用器插件负责将原始未解析的数据转换为特定的视频/�音频数据。
| Video Mux | Package | Description | Bianbu OS(Y/N) | Buildroot(Y/N) |
|---|---|---|---|---|
| qtmux | gst-plugins-good | Mux a raw data to a .mov file | Y | Y |
| matroskemux | gst-plugins-good | Mux a raw data to a .mkv file | Y | N |
| flvmux | gst-plugins-good | Mux a raw data to a .flv file | Y | N |
| avimux | gst-plugins-good | Mux a raw data to a .avi file | Y | Y |
| mp4mux | gst-plugins-good | Mux a raw data to a .mp4 file | Y | Y |
Audio Plugins
音频插件的作用是处理来自音频原始格式或特定音频数据格式(如 WAV)的数据。
| Audio Plugin | Package | Description | Bianbu OS(Y/N) | Buildroot(Y/N) |
|---|---|---|---|---|
| mpg123audiodec | gst-plugins-good | MP3 decoding plugin based on the mpg123 library | Y | N |
| vorbisdec | gst-plugins-base | Decodes raw vorbis streams to float audio | Y | N |
| vorbisenc | gst-plugins-base | Encodes audio in Vorbis format | Y | N |
| alsasink | gst-plugins-base | Output to a sound card via ALSA | Y | N |
| pulsesink | gst-plugins-good | Plays audio to a PulseAudio server | Y | N |
Image Plugins�
图像插件的作用是处理来自图像原始格式或特定数据格式(如 JPEG)的数据。
| Image Plugin | Package | Description | Bianbu OS(Y/N) | Buildroot(Y/N) |
|---|---|---|---|---|
| spacemitdec | gst-plugins-bad | Decodes H264/H265/MJPEG/VP8/VP9/MPEG2/MPEG4 via MPP API | Y | Y |
| spacemitmjpegenc | gst-plugins-bad | Encodes MJPEG via MPP API | Y | Y |
| imagefreeze | gst-plugins-good | Generates a still frame stream from an image | Y | N |
| jpegdec | gst-plugins-good | Decode images from JPEG format | Y | N |
| jpegenc | gst-plugins-good | JPEG image encoder | Y | N |
| pngdec | gst-plugins-good | Decode a png video frame to a raw image | Y | N |
| pngenc | gst-plugins-good | Encode a video frame to a .png image | Y | N |
Network Protocol Plugins
网络协议插件的作用是负责在设备之间建立网络连接。
| Network Plugins | Package | Description | Bianbu OS(Y/N) | Buildroot(Y/N) |
|---|---|---|---|---|
| udpsink | gst-plugins-good | Send data over the network via UDP | Y | Y |
| multiudpsink | gst-plugins-good | Send data over the network via UDP to one or multiple recipients | Y | Y |
| udpsrc | gst-plugins-good | Receive data over the network via UDP | Y | Y |
| tcpserversink | gst-plugins-base | Send data as a server over the network via TCP | Y | N |
| tcpclientsrc | gst-plugins-base | Receive data as a client over the network via TCP | Y | N |
| rtspsrc | gst-plugins-good | Receive data over the network via RTSP | Y | N |
Payload/Depayload Plugins
有效载荷插件负责在网络上传输数据,而去有效载荷插件则与这些插件结合使用,以接收和解包数据。
| Network Plugins | Package | Description | Bianbu OS(Y/N) | Buildroot(Y/N) |
|---|---|---|---|---|
| gdppay | gst-plugins-bad | Payloads GStreamer Data Protocol buffers | Y | N |
| gdpdepay | gst-plugins-bad | Depayloads GStreamer Data Protocol buffers | Y | N |
| rtpvrawpay | gst-plugins-good | Payload raw video as RTP packets | Y | Y |
| rtpvrawdepay | gst-plugins-good | Extracts raw video as RTP packets | Y | Y |
| rtph264pay | gst-plugins-good | Payload-encode H264 video into RTP packets | Y | Y |
| rtph264depay | gst-plugins-good | Extracts H264 video from RTP packets | Y | Y |
| rtpmpapay | gst-plugins-good | Payload MPEG audio as RTP packets | Y | Y |
| rtpmpadepay | gst-plugins-good | Extracts MPEG audio from RTP packets | Y | Y |
| rtpjitterbuffer | gst-plugins-good | A buffer that deals with network jitter and other transmission faults | Y | Y |
Gstreamer 基本命令
gst-launch-1.0
gst-launch-1.0:用于启动一个流水线(pipeline)来完成各种多媒体任务,例如:媒体播放或者录音等。
以下是一些常用的使用示例(以 SpacemiT 已适配的 GStreamer 插件为主):
摄像头应用场景
UVC 摄像头
- UVC 摄像头的信息可以通过以下命令进行获取:
$ gst-device-monitor-1.0
Device found:

        name  : UvcH264 HD Pro Webcam C920
        class : Video/CameraSource
        caps  : video/x-raw, format=YUY2, width=2304, height=1536, pixel-aspect-ratio=1/1, framerate=2/1
                video/x-raw, format=YUY2, width=2304, height=1296, pixel-aspect-ratio=1/1, framerate=2/1
                video/x-raw, format=YUY2, width=1920, height=1080, pixel-aspect-ratio=1/1, framerate=5/1
                video/x-raw, format=YUY2, width=1600, height=896, pixel-aspect-ratio=1/1, framerate={ (fraction)15/2, (fraction)5/1 }
                video/x-raw, format=YUY2, width=1280, height=720, pixel-aspect-ratio=1/1, framerate={ (fraction)10/1, (fraction)15/2, (fraction)5/1 }
                video/x-raw, format=YUY2, width=960, height=720, pixel-aspect-ratio=1/1, framerate={ (fraction)15/1, (fraction)10/1, (fraction)15/2, (fraction)5/1 }
                video/x-raw, format=YUY2, width=1024, height=576, pixel-aspect-ratio=1/1, framerate={ (fraction)15/1, (fraction)10/1, (fraction)15/2, (fraction)5/1 }
                video/x-raw, format=YUY2, width=800, height=600, pixel-aspect-ratio=1/1, framerate={ (fraction)24/1, (fraction)20/1, (fraction)15/1, (fraction)10/1, (fraction)15/2, (fraction)5/1 }
                video/x-raw, format=YUY2, width=864, height=480, pixel-aspect-ratio=1/1, framerate={ (fraction)24/1, (fraction)20/1, (fraction)15/1, (fraction)10/1, (fraction)15/2, (fraction)5/1 }
                video/x-raw, format=YUY2, width=800, height=448, pixel-aspect-ratio=1/1, framerate={ (fraction)30/1, (fraction)24/1, (fraction)20/1, (fraction)15/1, (fraction)10/1, (fraction)15/2, (fraction)5/1 }
                video/x-raw, format=YUY2, width=640, height=480, pixel-aspect-ratio=1/1, framerate={ (fraction)30/1, (fraction)24/1, (fraction)20/1, (fraction)15/1, (fraction)10/1, (fraction)15/2, (fraction)5/1 }
                video/x-raw, format=YUY2, width=640, height=360, pixel-aspect-ratio=1/1, framerate={ (fraction)30/1, (fraction)24/1, (fraction)20/1, (fraction)15/1, (fraction)10/1, (fraction)15/2, (fraction)5/1 }
                video/x-raw, format=YUY2, width=432, height=240, pixel-aspect-ratio=1/1, framerate={ (fraction)30/1, (fraction)24/1, (fraction)20/1, (fraction)15/1, (fraction)10/1, (fraction)15/2, (fraction)5/1 }
                video/x-raw, format=YUY2, width=352, height=288, pixel-aspect-ratio=1/1, framerate={ (fraction)30/1, (fraction)24/1, (fraction)20/1, (fraction)15/1, (fraction)10/1, (fraction)15/2, (fraction)5/1 }
                video/x-raw, format=YUY2, width=320, height=240, pixel-aspect-ratio=1/1, framerate={ (fraction)30/1, (fraction)24/1, (fraction)20/1, (fraction)15/1, (fraction)10/1, (fraction)15/2, (fraction)5/1 }
                video/x-raw, format=YUY2, width=320, height=180, pixel-aspect-ratio=1/1, framerate={ (fraction)30/1, (fraction)24/1, (fraction)20/1, (fraction)15/1, (fraction)10/1, (fraction)15/2, (fraction)5/1 }
                video/x-raw, format=YUY2, width=176, height=144, pixel-aspect-ratio=1/1, framerate={ (fraction)30/1, (fraction)24/1, (fraction)20/1, (fraction)15/1, (fraction)10/1, (fraction)15/2, (fraction)5/1 }
                video/x-raw, format=YUY2, width=160, height=120, pixel-aspect-ratio=1/1, framerate={ (fraction)30/1, (fraction)24/1, (fraction)20/1, (fraction)15/1, (fraction)10/1, (fraction)15/2, (fraction)5/1 }
                video/x-raw, format=YUY2, width=160, height=90, pixel-aspect-ratio=1/1, framerate={ (fraction)30/1, (fraction)24/1, (fraction)20/1, (fraction)15/1, (fraction)10/1, (fraction)15/2, (fraction)5/1 }
                image/jpeg, parsed=true, width=1920, height=1080, pixel-aspect-ratio=1/1, framerate={ (fraction)30/1, (fraction)24/1, (fraction)20/1, (fraction)15/1, (fraction)10/1, (fraction)15/2, (fraction)5/1 }
                image/jpeg, parsed=true, width=1600, height=896, pixel-aspect-ratio=1/1, framerate={ (fraction)30/1, (fraction)24/1, (fraction)20/1, (fraction)15/1, (fraction)10/1, (fraction)15/2, (fraction)5/1 }
                image/jpeg, parsed=true, width=1280, height=720, pixel-aspect-ratio=1/1, framerate={ (fraction)30/1, (fraction)24/1, (fraction)20/1, (fraction)15/1, (fraction)10/1, (fraction)15/2, (fraction)5/1 }
                image/jpeg, parsed=true, width=960, height=720, pixel-aspect-ratio=1/1, framerate={ (fraction)30/1, (fraction)24/1, (fraction)20/1, (fraction)15/1, (fraction)10/1, (fraction)15/2, (fraction)5/1 }
                image/jpeg, parsed=true, width=1024, height=576, pixel-aspect-ratio=1/1, framerate={ (fraction)30/1, (fraction)24/1, (fraction)20/1, (fraction)15/1, (fraction)10/1, (fraction)15/2, (fraction)5/1 }
                image/jpeg, parsed=true, width=800, height=600, pixel-aspect-ratio=1/1, framerate={ (fraction)30/1, (fraction)24/1, (fraction)20/1, (fraction)15/1, (fraction)10/1, (fraction)15/2, (fraction)5/1 }
                image/jpeg, parsed=true, width=864, height=480, pixel-aspect-ratio=1/1, framerate={ (fraction)30/1, (fraction)24/1, (fraction)20/1, (fraction)15/1, (fraction)10/1, (fraction)15/2, (fraction)5/1 }
                image/jpeg, parsed=true, width=800, height=448, pixel-aspect-ratio=1/1, framerate={ (fraction)30/1, (fraction)24/1, (fraction)20/1, (fraction)15/1, (fraction)10/1, (fraction)15/2, (fraction)5/1 }
                image/jpeg, parsed=true, width=640, height=480, pixel-aspect-ratio=1/1, framerate={ (fraction)30/1, (fraction)24/1, (fraction)20/1, (fraction)15/1, (fraction)10/1, (fraction)15/2, (fraction)5/1 }
                image/jpeg, parsed=true, width=640, height=360, pixel-aspect-ratio=1/1, framerate={ (fraction)30/1, (fraction)24/1, (fraction)20/1, (fraction)15/1, (fraction)10/1, (fraction)15/2, (fraction)5/1 }
                image/jpeg, parsed=true, width=432, height=240, pixel-aspect-ratio=1/1, framerate={ (fraction)30/1, (fraction)24/1, (fraction)20/1, (fraction)15/1, (fraction)10/1, (fraction)15/2, (fraction)5/1 }
                image/jpeg, parsed=true, width=352, height=288, pixel-aspect-ratio=1/1, framerate={ (fraction)30/1, (fraction)24/1, (fraction)20/1, (fraction)15/1, (fraction)10/1, (fraction)15/2, (fraction)5/1 }
                image/jpeg, parsed=true, width=320, height=240, pixel-aspect-ratio=1/1, framerate={ (fraction)30/1, (fraction)24/1, (fraction)20/1, (fraction)15/1, (fraction)10/1, (fraction)15/2, (fraction)5/1 }
                image/jpeg, parsed=true, width=320, height=180, pixel-aspect-ratio=1/1, framerate={ (fraction)30/1, (fraction)24/1, (fraction)20/1, (fraction)15/1, (fraction)10/1, (fraction)15/2, (fraction)5/1 }
                image/jpeg, parsed=true, width=176, height=144, pixel-aspect-ratio=1/1, framerate={ (fraction)30/1, (fraction)24/1, (fraction)20/1, (fraction)15/1, (fraction)10/1, (fraction)15/2, (fraction)5/1 }
                image/jpeg, parsed=true, width=160, height=120, pixel-aspect-ratio=1/1, framerate={ (fraction)30/1, (fraction)24/1, (fraction)20/1, (fraction)15/1, (fraction)10/1, (fraction)15/2, (fraction)5/1 }
                image/jpeg, parsed=true, width=160, height=90, pixel-aspect-ratio=1/1, framerate={ (fraction)30/1, (fraction)24/1, (fraction)20/1, (fraction)15/1, (fraction)10/1, (fraction)15/2, (fraction)5/1 }
                video/x-h264, stream-format=byte-stream, alignment=au, width=1920, height=1080, pixel-aspect-ratio=1/1, framerate={ (fraction)30/1, (fraction)24/1, (fraction)20/1, (fraction)15/1, (fraction)10/1, (fraction)15/2, (fraction)5/1 }
                video/x-h264, stream-format=byte-stream, alignment=au, width=1600, height=896, pixel-aspect-ratio=1/1, framerate={ (fraction)30/1, (fraction)24/1, (fraction)20/1, (fraction)15/1, (fraction)10/1, (fraction)15/2, (fraction)5/1 }
                video/x-h264, stream-format=byte-stream, alignment=au, width=1280, height=720, pixel-aspect-ratio=1/1, framerate={ (fraction)30/1, (fraction)24/1, (fraction)20/1, (fraction)15/1, (fraction)10/1, (fraction)15/2, (fraction)5/1 }
                video/x-h264, stream-format=byte-stream, alignment=au, width=960, height=720, pixel-aspect-ratio=1/1, framerate={ (fraction)30/1, (fraction)24/1, (fraction)20/1, (fraction)15/1, (fraction)10/1, (fraction)15/2, (fraction)5/1 }
                video/x-h264, stream-format=byte-stream, alignment=au, width=1024, height=576, pixel-aspect-ratio=1/1, framerate={ (fraction)30/1, (fraction)24/1, (fraction)20/1, (fraction)15/1, (fraction)10/1, (fraction)15/2, (fraction)5/1 }
                video/x-h264, stream-format=byte-stream, alignment=au, width=800, height=600, pixel-aspect-ratio=1/1, framerate={ (fraction)30/1, (fraction)24/1, (fraction)20/1, (fraction)15/1, (fraction)10/1, (fraction)15/2, (fraction)5/1 }
                video/x-h264, stream-format=byte-stream, alignment=au, width=864, height=480, pixel-aspect-ratio=1/1, framerate={ (fraction)30/1, (fraction)24/1, (fraction)20/1, (fraction)15/1, (fraction)10/1, (fraction)15/2, (fraction)5/1 }
                video/x-h264, stream-format=byte-stream, alignment=au, width=800, height=448, pixel-aspect-ratio=1/1, framerate={ (fraction)30/1, (fraction)24/1, (fraction)20/1, (fraction)15/1, (fraction)10/1, (fraction)15/2, (fraction)5/1 }
                video/x-h264, stream-format=byte-stream, alignment=au, width=640, height=480, pixel-aspect-ratio=1/1, framerate={ (fraction)30/1, (fraction)24/1, (fraction)20/1, (fraction)15/1, (fraction)10/1, (fraction)15/2, (fraction)5/1 }
                video/x-h264, stream-format=byte-stream, alignment=au, width=640, height=360, pixel-aspect-ratio=1/1, framerate={ (fraction)30/1, (fraction)24/1, (fraction)20/1, (fraction)15/1, (fraction)10/1, (fraction)15/2, (fraction)5/1 }
                video/x-h264, stream-format=byte-stream, alignment=au, width=432, height=240, pixel-aspect-ratio=1/1, framerate={ (fraction)30/1, (fraction)24/1, (fraction)20/1, (fraction)15/1, (fraction)10/1, (fraction)15/2, (fraction)5/1 }
                video/x-h264, stream-format=byte-stream, alignment=au, width=352, height=288, pixel-aspect-ratio=1/1, framerate={ (fraction)30/1, (fraction)24/1, (fraction)20/1, (fraction)15/1, (fraction)10/1, (fraction)15/2, (fraction)5/1 }
                video/x-h264, stream-format=byte-stream, alignment=au, width=320, height=240, pixel-aspect-ratio=1/1, framerate={ (fraction)30/1, (fraction)24/1, (fraction)20/1, (fraction)15/1, (fraction)10/1, (fraction)15/2, (fraction)5/1 }
                video/x-h264, stream-format=byte-stream, alignment=au, width=320, height=180, pixel-aspect-ratio=1/1, framerate={ (fraction)30/1, (fraction)24/1, (fraction)20/1, (fraction)15/1, (fraction)10/1, (fraction)15/2, (fraction)5/1 }
                video/x-h264, stream-format=byte-stream, alignment=au, width=176, height=144, pixel-aspect-ratio=1/1, framerate={ (fraction)30/1, (fraction)24/1, (fraction)20/1, (fraction)15/1, (fraction)10/1, (fraction)15/2, (fraction)5/1 }
                video/x-h264, stream-format=byte-stream, alignment=au, width=160, height=120, pixel-aspect-ratio=1/1, framerate={ (fraction)30/1, (fraction)24/1, (fraction)20/1, (fraction)15/1, (fraction)10/1, (fraction)15/2, (fraction)5/1 }
                video/x-h264, stream-format=byte-stream, alignment=au, width=160, height=90, pixel-aspect-ratio=1/1, framerate={ (fraction)30/1, (fraction)24/1, (fraction)20/1, (fraction)15/1, (fraction)10/1, (fraction)15/2, (fraction)5/1 }
        properties:
                device.path = /dev/video20
                udev-probed = false
                device.api = uvch264
                v4l2.device.driver = uvcvideo
                v4l2.device.card = HD Pro Webcam C920
                v4l2.device.bus_info = usb-xhci-hcd.0.auto-1.3
                v4l2.device.version = 394815 (0x0006063f)
                v4l2.device.capabilities = 2225078273 (0x84a00001)
                v4l2.device.device_caps = 69206017 (0x04200001)
                device.is-camerasrc = true
        gst-launch-1.0 uvch264src device=/dev/video20.vfsrc name=camerasrc ! ... camerasrc.vidsrc ! [video/x-h264] ...
可以看到,执行命令后输出各种重要信息,如相机分辨率、帧率和支持的格式,以及 UVC 摄像头对应 video capture 节点。
当然,也可以通过 v4l2-ctl 命令获取相关信息,此处不再赘述。
$ v4l2-ctl --list-devices
HD Pro Webcam C920 (usb-xhci-hcd.0.auto-1.3):
        /dev/video20
        /dev/video21
        /dev/media1
-
以下是一些使用 GStreamer 从 UVC 摄像头采集图像的示例,包括显示、丢弃和保存图像。这些示例以
/dev/video20为视频设备,采集分辨率为 640x480、帧率为 30fps、格式为 YUY2 的图像。- 采集图像后送显。
gst-launch-1.0 v4l2src device=/dev/video20 num-buffers=600 ! "video/x-raw,framerate=30/1,format=YUY2,width=640,height=480" ! videoconvert ! glsinkbin sink=gtkglsink- 采集图像后送显,并显示帧率。
gst-launch-1.0 v4l2src device=/dev/video20 num-buffers=600 ! "video/x-raw,framerate=30/1,format=YUY2,width=640,height=480" ! videoconvert ! fpsdisplaysink video-sink='glsinkbin sink='gtkglsink''- 采集图像后直接丢弃。
gst-launch-1.0 v4l2src device=/dev/video20 num-buffers=600 ! "video/x-raw,framerate=30/1,format=YUY2,width=640,height=480" ! fakesink- 采集图像后保存成文件。
gst-launch-1.0 v4l2src device=/dev/video20 num-buffers=600 ! "video/x-raw,framerate=30/1,format=YUY2,width=640,height=480" ! filesink location=output.yuv -
UVC 摄像头以 capture video 为 video20,采集 600 帧 480p JPEG 的格式图像并解码。(分辨率,帧率可以根据需求调整,只需摄像头自身支持该规格输出即可)
- 图像解码后送显。
gst-launch-1.0 v4l2src device=/dev/video20 num-buffers=600 ! "image/jpeg,framerate=30/1,width=640,height=480" ! typefind ! spacemitdec ! waylandsink sync=0 render-rectangle="<0,0,1280,720>"- 图像解码后编码保存。
gst-launch-1.0 v4l2src device=/dev/video20 num-buffers=600 ! "image/jpeg,framerate=30/1,width=640,height=480" ! typefind ! spacemitdec ! spacemith264enc ! filesink location=test.h264
MIPI 摄像头使用示例
以下是一些使用 GStreamer 从 MIPI 摄像头以 OV16A10 输出 1080P@NV12 的示例。这些示例假设 spacemitsrc 的 JSON 配置文件�已正确设置,具体配置请参考相机开发指南。
-
采集图像后送显,显示分辨率为 720p。(显示位置暂时没法设定)
gst-launch-1.0 spacemitsrc location=/usr/share/camera_json/csi1_camera_auto.json close-dmabuf=0 ! "video/x-raw(memory:DMABuf),format=NV12,width=1920,height=1080" ! waylandsink sync=0 render-rectangle="<0,0,1280,720>" -
采集图像后直接丢弃。
gst-launch-1.0 spacemitsrc location=/usr/share/camera_json/csi1_camera_auto.json close-dmabuf=0 ! "video/x-raw(memory:DMABuf),format=NV12,width=1920,height=1080" ! fakesink -
采集 10 帧图像保存成文件。
gst-launch-1.0 spacemitsrc location=/usr/share/camera_json/csi1_camera_auto.json close-dmabuf=0 num-buffers=10 ! "video/x-raw(memory:DMABuf),format=NV12,width=1920,height=1080" ! filesink location=test.yuv -
采集 1000 帧图像并��编码为 h264 保存。
gst-launch-1.0 spacemitsrc location=/usr/share/camera_json/csi1_camera_auto.json close-dmabuf=0 num-buffers=1000 ! "video/x-raw(memory:DMABuf),format=NV12,width=1920,height=1080" ! spacemith264enc ! filesink location=test.h264
在 Bianbu 上,可以使用 OpenCV 通过 GStreamer 采集 MIPI 摄像头的视频并显示。以下是具体步骤:
- 安装需要的工具和库
sudo apt install libopencv-dev python3 python3-opencv
- 创建 py 脚本
capture_video_opencv.py
import cv2

gst_str = 'spacemitsrc location=/home/bianbu/camtest_ov16a10.json close-dmabuf=1 ! video/x-raw,format=NV12,width=1280,height=720 ! appsink'

cap = cv2.VideoCapture(gst_str, cv2.CAP_GSTREAMER)  # 打开默认的摄像头

while True:
  ret, frame = cap.read()  # 读取视频帧
  frame = cv2.cvtColor(frame, cv2.COLOR_YUV2BGR_NV12)
  cv2.imshow('Video', frame)  # 显示视频帧

  if cv2.waitKey(1) & 0xFF == ord('q'):  # 按下 'q' 键退出循环
      break

cap.release()  # 释放摄像头
cv2.destroyAllWindows()  # 关闭所有窗口
- 执行脚本
python3 capture_video_opencv.py
上述 demo,OpenCV 使用 Gstreamer 进行的图像采集,输出 720p@NV12 格式,OpenCV 拿到数据后再转换成 RGB 格式,并进行显示。
解码应用场景
-
裸流视频解码
- h264 解码后显示
gst-launch-1.0 filesrc location=/root/compressed/h264/h264_w1280_h720_f30_r4_p1_8bit_300f_2112kb_high_cabac.264 ! h264parse ! spacemitdec ! queue ! waylandsink render-rectangle="<0,0,1280,720>"- h265 解码后显示
gst-launch-1.0 filesrc location=/root/compressed/hevc/hevc_w1920_h1080_f25_r_p1_8bit_200f_1878kb_main.265 ! queue ! h265parse ! spacemitdec ! queue ! waylandsink render-rectangle="<0,0,1280,720>"- vp8、vp9 解码后显示
gst-launch-1.0 filesrc location=/root/compressed/vp9/vp9_w1280_h720_f25_r_p1_8bit_120f_1996kb.ivf ! typefind ! ivfparse ! spacemitdec ! queue ! waylandsink render-rectangle="<0,0,1280,720>"- mjpeg 解码后显示
gst-launch-1.0 filesrc location=/root/compressed/mjpeg/mjpeg_w1280_h720_f_r_p1_8bit_120f_kb_yuv420.mjpeg ! typefind ! spacemitdec ! queue ! waylandsink render-rectangle="<0,0,1280,720>"- mpeg2 解码后显示
gst-launch-1.0 filesrc location=/root/compressed/mpeg2/mpeg2_w1920_h1080_f30_r_p1_8bit_120f_6236kb_main.mpg ! mpegpsdemux ! mpegvideoparse ! spacemitdec ! queue ! waylandsink render-rectangle="<0,0,1280,720>"- mpeg4 解码后显示
gst-launch-1.0 filesrc location=/root/compressed/mpeg4/mpeg4_w1280_h720_f_r_p1_8bit_120f_3429kb_simple.mpeg4 ! mpeg4videoparse ! spacemitdec ! queue ! waylandsink sync=0 render-rectangle="<0,0,1280,720>" -
封装格式视频解码
- H.264/H.265/VP8/VP9/MJPEG/MPEG 解码后显示
gst-launch-1.0 filesrc location=C079_1080P_AVC_AAC_8M_24F.mp4 ! qtdemux name=d d.video_0 ! queue ! **h264parse** ! spacemitdec ! queue ! waylandsink render-rectangle="<0,0,1280,720>"
spacemitdec 支持多种视频格式。为了正确使用它,请务必正确地调用解析器,例如:H.264 格式使用 h264parse,H.265 格式使用 h265parse 等。
编码应用场景
测试视频源:NV12 格式,720P(1280×720),25fps
-
编码为 H.264
gst-launch-1.0 videotestsrc num-buffers=100 ! 'video/x-raw,format=NV12, width=1280, height=720, framerate=25/1' ! spacemith264enc ! filesink location=test.264或从 YUV 文件输入:
gst-launch-1.0 filesrc location=nv12_720p_100f.yuv ! videoparse format=23 width=1280 height=720 framerate=30/1 ! spacemith264enc ! filesink location=test.264 -
编码为 H.265
gst-launch-1.0 videotestsrc num-buffers=100 ! 'video/x-raw,format=NV12, width=1280, height=720, framerate=25/1' ! spacemith265enc ! filesink location=test.265 -
编码为 VP9(封装为 WebM)
gst-launch-1.0 -v videotestsrc num-buffers=1000 ! spacemitvp9enc ! webmmux ! filesink location=videotestsrc.webm
//对应的解码命令为
gst-launch-1.0 -v filesrc location=videotestsrc.webm ! matroskademux ! vp9dec ! videoconvert ! videoscale ! autovideosink -
编码为 VP8(封装为 WebM)
gst-launch-1.0 -v videotestsrc num-buffers=1000 ! spacemitvp8enc ! webmmux ! filesink location=videotestsrc.webm
//对应的解码命令为
gst-launch-1.0 -v filesrc location=videotestsrc.webm ! matroskademux ! vp8dec ! videoconvert ! videoscale ! autovideosink -
编码为 MJPEG
gst-launch-1.0 videotestsrc num-buffers=100 ! 'video/x-raw,format=NV12, width=1280, height=720, framerate=25/1' ! spacemitmjpegenc ! filesink location=test.mjpeg
Mux/Demux 应用场景
Mux plugins (将流封装为文件)
- qtmux
将摄像头 JPEG 流封装为
.mov文件:
gst-launch-1.0 v4l2src device=/dev/video20 num-buffers=600 ! "image/jpeg,framerate=30/1,width=640,height=480" ! qtmux ! filesink location=video.mov
- matroskamux
将 MP3 音频封装为.mkv文件:
gst-launch-1.0 filesrc location=test.mp3 ! mpegaudioparse ! matroskamux ! filesink location=test.mkv
- mp4mux
摄像头视频编码为 H.264 并封装为.mp4:
gst-launch-1.0 v4l2src num-buffers=50 ! queue ! x264enc ! mp4mux ! filesink location=video.mp4
- flvmux
将音频和视频合并为.flv文件:
gst-launch-1.0 filesrc location=/root/K001-MPEG-16bit-44.1kHz-CBR-192kbps-stereo.mp3 ! decodebin ! queue ! flvmux name=mux ! filesink location=test.flv filesrc location=../mp4/480p.mp4 ! decodebin ! queue ! mux.
- avimux
生成.avi格式测试视频:
gst-launch-1.0 videotestsrc num-buffers=100 ! 'video/x-raw,format=I420,width=640,height=480,framerate=30/1' ! avimux ! filesink location=test.avi
Demux plugins
- qtdemux
gst-launch-1.0 filesrc location=test.mov ! qtdemux name=demux  demux.audio_0 ! queue ! decodebin ! audioconvert ! audioresample ! autoaudiosink   demux.video_0 ! queue ! decodebin ! videoconvert ! videoscale ! autovideosink
//如果视频源只有video,则使用以下命令进行demux
 gst-launch-1.0 filesrc location=video.mov ! qtdemux name=demux   demux.video_0 ! queue ! decodebin ! videoconvert ! videoscale ! autovideosink
- matroskademux
gst-launch-1.0 -v filesrc location=/path/to/mkv ! matroskademux ! vorbisdec ! audioconvert ! audioresample ! autoaudiosink
- flvdemux
gst-launch-1.0 -v filesrc location=/path/to/flv ! flvdemux ! audioconvert ! autoaudiosink
- avidemux
gst-launch-1.0 filesrc location=test.avi ! avidemux name=demux demux.audio_00 ! decodebin ! audioconvert ! audioresample ! autoaudiosink demux.video_00 ! queue ! decodebin ! videoconvert ! videoscale ! autovideosink
Audio 应用场景
本节描述使用 GStreamer 进行音频输出的一些基本管道。
- 音频播放
音频播放是指根据音频文件的特定格式播放确定的音频文件的过程。下面管道使用 audiotestsrc 插件输出标准的音频到耳机插孔。
gst-launch-1.0 audiotestsrc wave=5 ! alsasink device=plughw:1
-
音频解码
- 播放 mp3 格式文件
gst-launch-1.0 filesrc location=test.mp3 ! mpegaudioparse ! mpg123audiodec
! audioconvert ! audioresample ! autoaudiosink- 播放 ogg vorbis 格式文件
gst-launch-1.0 -v filesrc location=test.ogg ! oggdemux ! vorbisdec ! audioconvert ! audioresample ! autoaudiosink -
音频格式转换
音频转换是将音频文件的当前格式更改为另一种所需格式的过程,例如将.wav 更改为.aac。
gst-launch-1.0 -v autoaudiosrc ! audioconvert ! vorbisenc ! oggmux ! filesink location=alsasrc.ogg
图片应用场景
本节描述使用 GStreamer 进行图片输出的一些基本管道。
- 图片输出
图片输出包括在所需屏幕或任何其他类型的输出源上显示所需图片文件的过程。
- 显示 PNG 图片
gst-launch-1.0 -v filesrc location=some.png ! decodebin ! videoconvert ! imagefreeze ! autovideosink
- 显示 JPEG 图片
gst-launch-1.0 -v filesrc location=<output_image>.jpeg ! jpegdec ! imagefreeze ! videoconvert ! autovideosink
-
图片拍摄 对于图片拍摄,可以从相机获取图像。
- JPG 格式
gst-launch-1.0 v4l2src num-buffers=1 ! jpegenc ! filesink location=capture.jpg- PNG 格式
gst-launch-1.0 v4l2src num-buffers=1 ! pngenc ! filesink location=capture.png- JPEG 格式
gst-launch-1.0 v4l2src num-buffers=1 ! jpegenc ! filesink location=capture.jpeg
转码应用场景
本节展示如何设置和运行基本的转码管道。
-
视频转码 将摄像头输出的 MJPEG 数据转码为 MKV 文件:
gst-launch-1.0 v4l2src device=/dev/video20 ! jpegparse ! spacemitdec ! queue ! videoconvert ! spacemith264enc ! h264parse ! matroskamux ! filesink location=out.mkv
视频流传输场景
Rtsp
-
下载项目源码 访问 https://github.com/GStreamer/gst-rtsp-server,并切换到 1.18 分支
-
编译安装
-
开启 RTSP 服务器 在服务器端运行以下命令,启动 RTSP 服务器并发布视频流:
./test-launch "( spacemitsrc location=/usr/share/camera_json/csi1_camera_auto.json close-dmabuf=0 ! spacemith264enc ! rtph264pay name=pay0 pt=96 )"
- 客户端连接 RTSP 并播放视频。
视频合成场景
- 多路数据合并输出
gst-launch-1.0 videotestsrc ! video/x-raw,width=1280,height=720 ! tee name=testsrc ! queue ! compositor name=comp sink_0::xpos=0 sink_0::ypos=0 \
sink_1::xpos=100 sink_1::ypos=100 sink_1::width=200 sink_1::height=200 \
sink_2::xpos=300 sink_2::ypos=300 sink_2::width=100 sink_2::height=200 \
sink_3::xpos=400 sink_3::ypos=600 sink_3::width=100 sink_3::height=100 ! videoconvert ! autovideosink testsrc. ! queue ! comp.sink_1 testsrc. ! queue ! comp.sink_2 testsrc. ! queue ! comp.sink_3
- 两路摄像头合并输出
gst-launch-1.0 -v compositor name=comp sink_0::xpos=0 sink_0::ypos=0 sink_0::width=640 sink_0::height=480 sink_1::xpos=0 sink_1::ypos=480 sink_1::width=640 sink_1::height=480 ! autovideosink v4l2src device=/dev/video20 ! video/x-raw,width=640,height=480 ! comp.sink_0 v4l2src device=/dev/video22 ! video/x-raw,width=640,height=480 ! comp.sink_1
Gstreamer 调试方法
本节介绍常用的 GStreamer 调试工具及其使用场景。
使用 GStreamer 日志系统
当 Pipeline 运行异常或行为不符合预期时,GStreamer 内建的日志系统是首要的调试手段。通过查看日志的关键信息,帮助快速定位问题。
GST_DEBUG
GStreamer 框架以及其插件提供了不同级别的日志信息,日志中包含时间戳,进程 ID,线程 ID,类型,源码行数,函数名,Element 信息以及相应的日志消息。例如:
$ GST_DEBUG=2 gst-launch-1.0 playbin uri=file:///x.mp3Setting pipeline to PAUSED ...
0:00:00.014898047 47333      0x2159d80 WARN                 filesrc gstfilesrc.c:530:gst_file_src_start:<source> error: No such file "/x.mp3"
...
可以发现,只需在运行时设置 GST_DEBUG 环境变量并指定日志级别,即可获取相应的日志信息。由于 GStreamer 日志较为详尽,开启全部日志会影响程序性能,因此系统提供了 8 个日志级别,用于按需输出不同详细程度的信息。
- 级别 0:不输出任何日志信息
- 级别 1:ERROR 信息
- 级别 2:WARNING 信息
- 级别 3:FIXME 信息
- 级别 4:INFO 信息
- 级别 5:DEBUG 信息
- 级别 6:LOG 信息
- 级别 7:TRACE 信息
- 级别 8:MEMDUMP 信息,最高级别日志
使用时,只需将 GST_DEBUG 设置为指定级别,所有等于或低于该级别的日志都会被输出。例如:GST_DEBUG=2 会显示 ERROR 和 WARNING 级别的日志。
上述设置适用于所有模块使用同一级别。若需为特定插件单独设置级别,可使用 模块名:级别 的格式。例如:
GST_DEBUG=2,audiotestsrc:6 表示全局级别为 2,仅 audiotestsrc 元素的日志级别设为 6�。
这样,GST_DEBUG 的值是以逗号分隔的”模块名:级别“的键值对,可以在最开始增加其他未指定模块的默认日志级别,多个模块名可以使用逗号隔开。同时,GST_DEBUG 的值还支持”*“通配符。
GST_DEBUG 的值由逗号分隔的 模块名:级别 组成,支持以下特性:
- 可在开头设置默认级别(未指定模块将使用该级别);
- 支持多个模块分别设置;
- 支持
*通配符进行模糊匹配。
示例:
GST_DEBUG=2,audio*:6 — 所有以 audio 开头的模块使用级别 6,其余模块使用级别 2。
等效写法:
GST_DEBUG=*:2 与 GST_DEBUG=2 效果相同,表示所有模块均使用级别 2。
GST_DEBUG_FILE
在实际调试中,为便于后续分析,通常会将日志输出保存到文件。可通过设置 GST_DEBUG_FILE 环境变量指定日志文件路径,GStreamer 会自动将调试信息写入该文件。
GST_DEBUG=2 GST_DEBUG_FILE=pipeline.log GST_DEBUG=5 gst-launch-1.0 audiotestsrc ! autoaudiosink
使用 Graphviz 工具
当 Pipeline 结构复杂时,我们需要知道 Pipeline 是否按预期运行、使用到哪些 Element,尤其是使用 playbin、uridecodebin 时。为此,GStreamer 提供了相应的功能,能够将 Pipeline 在当前状态下所有的 Elements 及其关系输出成 .dot 文件,再通过 Graphviz 等工具可以将其转换成图片文件。
为了得到 .dot 文件,我们只需通过 GST_DEBUG_DUMP_DOT_DIR 环境变量,指定输出目录即可,gst-launch-1.0 会在各状态分别生成一个 .dot 文件。 例如:通过下列命令,我们可以得到使用 playbin 播放网络文件时生成的 Pipeline:
$ GST_DEBUG_DUMP_DOT_DIR=. gst-launch-1.0 playbin uri=https://www.freedesktop.org/software/gstreamer-sdk/data/media/sintel_trailer-480p.webm
$ ls *.dot
0.00.00.013715494-gst-launch.NULL_READY.dot
0.00.00.170999259-gst-launch.PAUSED_PLAYING.dot
0.00.07.642049256-gst-launch.PAUSED_READY.dot
0.00.00.162033239-gst-launch.READY_PAUSED.dot
0.00.07.606477348-gst-launch.PLAYING_PAUSED.dot

$ apt-get install graphviz
$ dot 0.00.00.170999259-gst-launch.PAUSED_PLAYING.dot -Tpng -o play.png
生成的 play.png 如下(结果会根据安装的插件不同而不同):

注意: 在自定义应用中,仅设置 GST_DEBUG_DUMP_DOT_DIR 环境变量是不够的。若要生成 .dot 文件,必须在代码中主动调用 GST_DEBUG_BIN_TO_DOT_FILE() 或 GST_DEBUG_BIN_TO_DOT_FILE_WITH_TS() 函数,才能输出 Pipeline 的结构信息。
其他调试方法
以下是一些在特定嵌入式环境中调试 GStreamer 显示和解码问题的常用方法。
-
指定 Wayland 显示环境运行预览
- Buildroot
串口执行命令,实现预览画面。
可以在 Gstramer 命令前加上:
WAYLAND_DISPLAY=wayland-1 XDG_RUNTIME_DIR=/root/,示例如下:
WAYLAND_DISPLAY=wayland-1 XDG_RUNTIME_DIR=/root/  gst-launch-1.0 spacemitsrc l
ocation=k1-x_MUSE-Paper_sensor0_gc08a8.json ! waylandsink sync=0 render-rectangl
e="<0,0,1280,720>"- Bianbu OS
串口执行命令,实现预览画面。
需要先登录桌面,然后在 Gstreamer 命令前加上:
WAYLAND_DISPLAY=wayland-0 XDG_RUNTIME_DIR=/run/user/1000,示例如下:
WAYLAND_DISPLAY=wayland-0 XDG_RUNTIME_DIR=/run/user/1000 gst-launch-1.0 filesrc location=/root/3840x2160_24bits_30fps_266p.h265 ! h265parse ! spacemitdec ! fpsdisplaysink video-sink='glsinkbin sink='gtkglsink sync=0'' - Buildroot
串口执行命令,实现预览画面。
可以在 Gstramer 命令前加上:
-
排查解码问题:排除片源本身异常
当使用
spacemitdec等专用硬件解码插件失败时,应先确认是否为片源(裸流)本身存在问题。建议按以下顺序排查:- 使用通用的 Gstreamer 插件替换 SpacemiT 解码插件进行调试。
- 使用
ffplay解码片源观察是否有问题。 - 使用 MPP 自带测试工具, 解码片源观察是否有问题。 参考 SpacemiT MPP 文档 使用其提供的测试工具进行解码测试